Show number of items hidden when it overflows in Row Widget
In this post, I will explain how we can show the number of elements hidden when overflow occurs in a Row widget as shown in the image.
 Anil Rao K
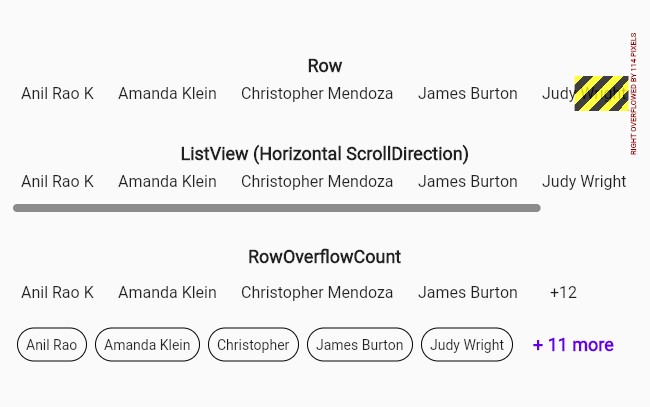
Flutter - Show the number of elements hidden when overflow occurs in Row Widget
In this post, I will explain how we can show the number of elements hidden when overflow occurs in a Row widget.
Let us first consider the case where we show a list of items in a Row widget.
In this case, if there are more items than the width of the screen, we'll see the error shown in the image above (Right overflowed by x pixels).
If you look at the logs, it'll have an error similar to "A RenderFlex overflowed by x pixels on the right.". Here x can be any number.
To show all the items in the Row, the Row widget needs deviceWidth + x pixels. But since that is not available, it throws RenderFlex overflowed.
In such cases, we can use ListView. ListView will show items in a scrollable list. So, we can fix the issue by creating a ListView, with scrollDirection set to horizontal.
There are cases where you might not want the items to be scrollable. We might want to show the items that can be shown in the space available and then show the number of items that we were not able to show at the end. Something like "+3 items" at the end. You can look at the examples in the image above under RowOverflowCount. You can achieve this using the library, row_overflow_count.
Now, let us look at how this is done in row_overflow_count.
To show the number of elements hidden when overflow occurs in a Row, we have to do the following:
- Calculate the width of the overflow count text (example: "+ 3 more")
- Calculate how many items can be shown without clipping any elements
For this example, let us assume that we want to show the overflow count text to be in "+ x more" format.
1. Calculate the width of the overflow text:
Flutter provides a class TextPainter which can be used to paint text on a canvas.
TextPainter class provides many useful properties and methods. We are mostly concerned with layout() method and size property.
We can first call layout() on the TextPainter object and then get the width required to paint the text using the size.width property.
Below is an example of how we can get the size that will be required to paint the text.
  Size calcTextSize(String text, TextStyle style) {
    final TextPainter textPainter = TextPainter(
      text: TextSpan(text: text, style: style),
      textDirection: TextDirection.ltr,
      textScaleFactor: WidgetsBinding.instance.window.textScaleFactor,
    )..layout();
    return textPainter.size;
  }
So now we can get the width required to show "+ x more", by calling size.width on the result we get from calcTextSize() method.
2. Calculate how many items can be shown without clipping any elements:
Now we can get the total available width, using the LayoutBuilder like below.
LayoutBuilder(
  builder: (context, constraints) {
    var width = constraints.maxWidth;
  },
);
This helps us get the width available to draw our custom Row of widgets.
Now, if we subtract the width of overflow text (from Step 1) from the width that we get from LayoutBuilder, we get the width available to draw the Row items.
We can now reuse the method calcTextSize() from method 1 to calculate the size of each Row item.
We have to do this until the sum of width of Row items is less than (available width - overflow text width).
Now that you know how many items can be made visible, you can build a Row normally with only the items that'll be visible.
You can check out the full code on GitHub here.
If you simply want to use the library in your Flutter project, add row_overflow_count to your pubspec.yaml file.